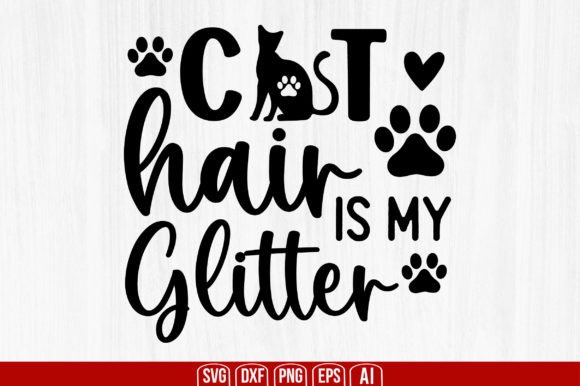
Cat Hair Is My Glitter
If you live with cats, you already know the truth: cat hair is the glitter of the pet world. It sticks to everything, sparkles with personality, and somehow multiplies overnight. The phrase “Cat Hair is My Glitter” has become a rallying cry for cat lovers who embrace the chaos. Now you can carry that sentiment into your hands-on projects with a digital design file that works across multiple cutting and design platforms.
This isn’t just a sticker or a T-shirt idea. It’s a practical, reusable asset that fits into your workflow before, during, or after any craft project where you want to show your feline allegiance. Whether you run a small Etsy shop, teach a crafting class, or just need a fun decal for your laptop, understanding how to integrate this file into your process will save you time and frustration.
Understanding the Product
The Cat Hair Is My Glitter digital download includes one .zip file containing five formats: SVG, PNG, EPS, DXF, and JPEG. Each format serves a specific purpose in your pipeline. The SVG and DXF are vector files ideal for cut machines like Cricut, Silhouette, or Brother ScanNCut. The PNG works for print-then-cut projects or digital use. EPS is a fallback for professional vector editing in Adobe Illustrator or Inkscape. JPEG is a simple image for reference or quick mockups.
There is no physical product. What you get is a digital asset you can use again and again on different materials – vinyl, cardstock, iron-on, adhesive foil, even wood blanks if you use a cutting machine with a knife blade. The file is yours to keep and reuse across personal or small commercial projects.
Before the Project: Planning and Preparation
Before you cut or print anything, you need a clear idea of where the final piece will go. Are you making a sticker for your water bottle? A decal for your car window? A shirt for the next cat convention? The “Cat Hair is My Glitter” design is versatile enough for all these applications because of its simple, readable text and playful tone.
Start by measuring your target surface. Open the SVG in your design software (Cricut Design Space, Silhouette Studio, or Adobe Illustrator) and resize the design to fit. Because it’s a vector, you can scale without losing quality. I recommend keeping the stroke thickness proportional; don’t shrink it below two inches across if you plan to weeding intricate details.
Decide on material. If using permanent vinyl for a laptop, choose a matte finish to avoid glare. For apparel, stick to heat-transfer vinyl (HTV) and mirror the design before cutting. The DXF and SVG both support mirroring easily in your software.
During the Project: Cutting, Weeding, and Transfer
Load the file into your cutting machine’s software. With Cricut, use the SVG format. For Silhouette, the DXF often works better because it preserves line layers without re-grouping. Set your material type (e.g., premium vinyl, 12×12) and let the machine cut. Because this design consists of text, you’ll have several island pieces – each letter. This makes weeding straightforward: remove the negative space around the letters, then use transfer tape to lift the entire phrase.
One integration tip: before applying, place the transfer tape with design onto your surface and use a hinge method to ensure straight alignment. Burnish well. This design is forgiving because the word spacing is generous, but you still want a clean, bubble-free result.
If you’re using the PNG for print-then-cut, import it, set the file as a print image, and let your machine print the design on sticker paper before cutting the outline. The JPEG works similarly but lacks transparency; you might need to remove the background manually.
After the Project: Quality Control and Reuse
Once applied, check adhesion at edges, especially on curved surfaces. If you’re making multiple items (e.g., for a small business), keep a project template in your software with the design already sized and mirrored for HTV. This saves time on repeat orders. The EPS file is handy for advanced users who want to tweak the font or add a border before exporting new formats.
For long-term reuse, store the original .zip file in a cloud folder like Google Drive or Dropbox. Label it clearly: “CatHairIsMyGlitter_original.” If you ever lose your cut settings, you can re-import and adjust blade pressure or material type without needing to re-purchase.
Compatibility and Software
Not every program handles every file type the same way. Here’s a quick compatibility guide:
- SVG – Best for Cricut Design Space, Inkscape, Adobe Illustrator, and web-based editors. Open directly without conversion.
- DXF – Preferred by Silhouette Studio (especially for older versions) and some laser cutters. May require scaling check after import.
- EPS – Great for Adobe Illustrator and CorelDRAW. Older EPS files can be tricky in Inkscape; use the SVG instead.
- PNG – High-resolution with transparent background. Good for digital mockups, social media graphics, or print-then-cut workflows.
- JPEG – Solid background (white). Use for previews or simple printing if you don’t need transparency.
If you work across multiple devices, keep all five formats in a single folder. When moving between, say, a Windows PC with Silhouette Studio and a Mac with Inkscape, you won’t need to convert anything – just pick the right format for the current tool.
Workflow Example: Small Business Owner
Imagine you sell cat-themed decals at local markets. You can pre-cut a batch of “Cat Hair Is My Glitter” decals in bulk. Using the SVG, set up a project with multiple copies of the design on one mat. Group them, duplicate, and arrange to maximize material use. Cut once, weed all at once, and apply transfer tape to entire sheets. This batch processing slashes production time. The EPS file lets you adjust kerning if you want to expand or condense the phrase for different surface lengths.
For quality control, test one decal on the actual material type you plan to sell. Check that the letters lift evenly and that the adhesive holds after a week. Because the design is text-based, it’s less prone to weeding errors than detailed graphics, but still verify that descenders (like the tail of the “y”) don’t tear during removal.
Hobbyist Integration: From Digital to Physical
Even if you’re crafting just for fun, the file streamlines your process. Instead of designing the text yourself (finding the right font, spacing, layout), you load the ready-made vector. That saves 15–30 minutes of layout time. Now you can focus on material selection and application technique, which are the skill-building parts.
If you’re a blogger or educator demonstrating a craft project, use the PNG for step-by-step visuals. You can show the design before cutting, during weeding, and after application without revealing the actual vector file if you want to keep it for your own use. The JPEG works as a mockup placeholder in blog graphics.
Long-Term Use and Organization
A digital asset like this only holds value if you can find it later. Maintain a master digital library with subfolders for SVG, DXF, etc., or a single folder with a spreadsheet listing tags like “cat, glitter, humor, decal.” The file name itself is descriptive, so you can search “Cat Hair is My Glitter” quickly.
If you ever upgrade software or buy a new cutting machine, re-import the file and adjust settings. The vector formats are non-proprietary, so they’re future-proof. This is especially important for professionals who switch from Cricut to a laser engraver – the DXF or SVG will carry over with proper scaling.
Finally, respect the license terms. Most designers allow personal and small commercial use (up to a certain number of sales). Check the included or linked licensing info. If you’re unsure, use it only for personal projects. This keeps your workflow ethical and avoids legal hiccups when you scale from hobby to business.
Why This Design Works in Any Creative Routine
The phrase itself resonates with anyone who has ever laughed at the impossibility of lint-rolling their life away. It’s relatable, shareable, and endlessly giftable. From a production standpoint, the vector nature means it works whether you’re making one sticker for your own planner or 500 decals for a craft fair. The five-file bundle removes the friction of format conversion – that’s a workflow win.
Integrate it as a standalone project or combine it with other cat-themed designs to create sets. Keep the original file untouched and make copies for modifications. If you ever need a larger size (like for a poster), the EPS or SVG scales cleanly.
The most common pitfall is forgetting to mirror for heat transfer. Double-check your software’s mirror option before cutting HTV. A few seconds of verification saves wasting material. And always test on a scrap piece first if you’re using a new material – this is universal to any cutting workflow.
Over time, you’ll develop muscle memory for how this design handles. You’ll know if your blade needs a deeper cut on the tall letters, or if your transfer tape is tacky enough for the serifs. This familiarity speeds up subsequent projects. That’s the hallmark of a good digital asset: it gets better the more you use it, because you optimize your process around it.
Whether you’re a seasoned crafter or just starting, the Cat Hair Is My Glitter digital download adds a touch of humor to your work while fitting seamlessly into your existing tools and materials. Open the .zip, pick your format, and let the cutting begin.